- Availability
- Airbyte Cloud Airbyte OSS
- Support Level
- Certified
- Latest Version
- 4.1.5
Airtable
This page contains the setup guide and reference information for the Airtable source connector.
Prerequisites
- An active Airtable account
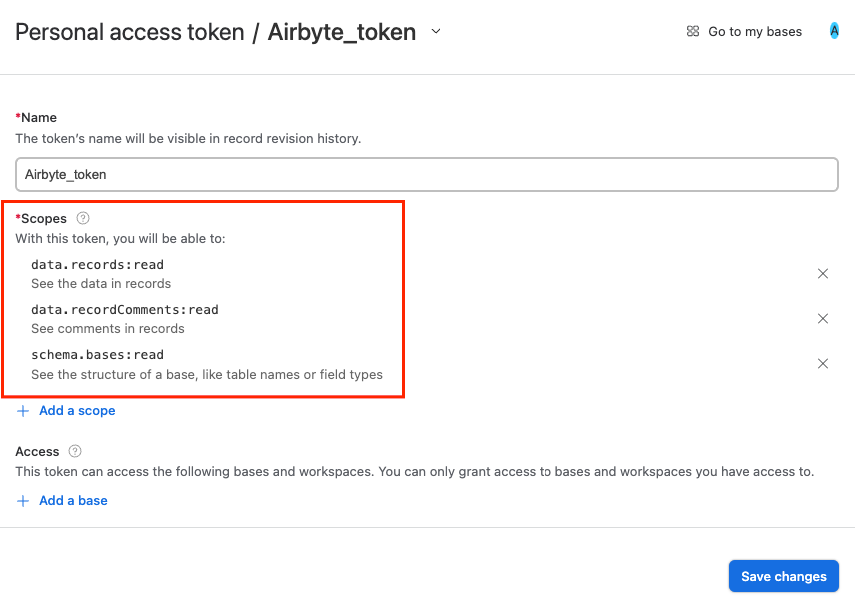
- Personal Access Token with the following scopes:
data.records:readdata.recordComments:readschema.bases:read
Setup guide
Step 1: Set up Airtable
For Airbyte Open Source:
-
Go to https://airtable.com/create/tokens to create new token.

-
Add following scopes:
data.records:readdata.recordComments:readschema.bases:read

-
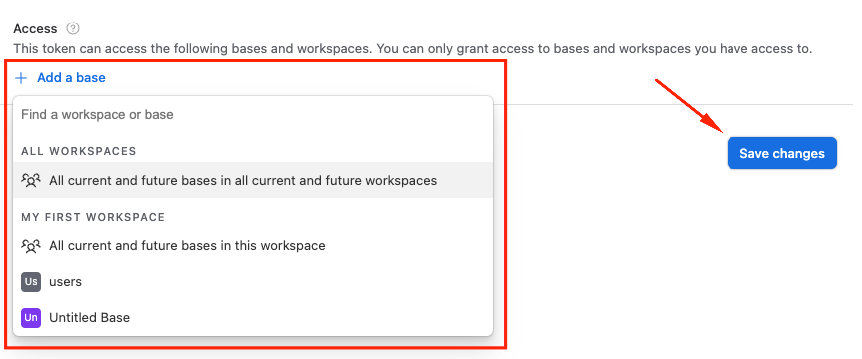
Select required bases or allow access to all available and press the
Create Tokenbutton.
-
Save token from the popup window.
Step 2: Set up Airtable connector in Airbyte
For Airbyte Cloud:
- Log into your Airbyte Cloud account.
- In the left navigation bar, click Sources. In the top-right corner, click +new source.
- On the Set up the source page, enter the name for the Airtable connector and select Airtable from the Source type dropdown.
- You can use OAuth or a Personal Access Token to authenticate your Airtable account. We recommend using OAuth for Airbyte Cloud.
- To authenticate using OAuth, select OAuth2.0 from the Authentication dropdown click Authenticate your Airtable account to sign in with Airtable, select required workspaces you want to sync and authorize your account.
- To authenticate using a Personal Access Token, select Personal Access Token from the Authentication dropdown and enter the Access Token for your Airtable account.
When using OAuth, you may see a 400 or 401 error causing a failed sync. You can re-authenticate your Airtable connector to solve the issue temporarily. We are working on a permanent fix that you can follow here.
- Click Set up source.
For Airbyte OSS:�
- Navigate to the Airbyte Open Source dashboard
- In the left navigation bar, click Sources. In the top-right corner, click +new source.
- On the Set up the source page, enter the name for the Airtable connector and select Airtable from the Source type dropdown.
- Select Personal Access Token from the Authentication dropdown and enter the Access Token for your Airtable account.
- Click Set up source.
Note on changed table names and deleted tables
Please keep in mind that if you start syncing a table via Airbyte, then rename it in your Airtable account, the connector will not continue syncing that table until you reset your connection schema and select it again. At that point, the table will begin syncing to a table with the new name in the destination. This is because there is no way for Airtable to tell Airbyte which tables have been renamed. Similarly, if you delete a table that was previously syncing, the connector will stop syncing it.
Supported sync modes
The airtable source connector supports the following sync modes:
Supported Tables
This source allows you to pull all available tables and bases using Metadata API for a given authenticated user. In case you rename or add a column to any existing table, you will need to recreate the source to update the Airbyte catalog.
Performance Considerations
See information about rate limits here.
Data type map
| Integration Type | Airbyte Type | Nullable |
|---|---|---|
multipleAttachments | string | Yes |
autoNumber | string | Yes |
barcode | string | Yes |
button | string | Yes |
checkbox | boolean | Yes |
singleCollaborator | string | Yes |
count | number | Yes |
createdBy | string | Yes |
createdTime | datetime, format: date-time | Yes |
currency | number | Yes |
email | string | Yes |
date | string, format: date | Yes |
duration | number | Yes |
lastModifiedBy | string | Yes |
lastModifiedTime | datetime, format: date-time | Yes |
multipleRecordLinks | array with strings | Yes |
multilineText | string | Yes |
multipleCollaborators | array with strings | Yes |
multipleSelects | array with strings | Yes |
number | number | Yes |
percent | number | Yes |
phoneNumber | string | Yes |
rating | number | Yes |
richText | string | Yes |
singleLineText | string | Yes |
externalSyncSource | string | Yes |
url | string | Yes |
formula | string, number or array with any | Yes |
lookup | array with any | Yes |
multipleLookupValues | array with any | Yes |
rollup | array with any | Yes |
- All the fields are
nullableby default, meaning that the field could be empty. - The
array with any- represents the classic array with one of the other Airtable data types inside, such as:- string
- number/integer
- nested lists/objects
Changelog
| Version | Date | Pull Request | Subject |
|---|---|---|---|
| 4.1.5 | 2023-10-19 | 31599 | Base image migration: remove Dockerfile and use the python-connector-base image |
| 4.1.4 | 2023-10-19 | 31360 | Update docstings |
| 4.1.3 | 2023-10-13 | 31360 | Update error message for invalid permissions |
| 4.1.2 | 2023-10-10 | 31215 | Exclude bases without permission |
| 4.1.1 | 2023-10-10 | 31119 | Add user-friendly error message when refresh token has expired |
| 4.1.0 | 2023-10-10 | 31044 | Add source table name to output records |
| 4.0.0 | 2023-10-09 | 31181 | Additional schema processing for the FORMULA schema type: Convert to simple data types |
| 3.0.1 | 2023-05-10 | 25946 | Skip stream if it does not appear in catalog |
| 3.0.0 | 2023-03-20 | 22704 | Fix for stream name uniqueness |
| 2.0.4 | 2023-03-15 | 24093 | Update spec and doc |
| 2.0.3 | 2023-02-02 | 22311 | Fix for singleSelect types when discovering the schema |
| 2.0.2 | 2023-02-01 | 22245 | Fix for empty result object when discovering the schema |
| 2.0.1 | 2023-02-01 | 22224 | Fixed broken API Key authentication |
| 2.0.0 | 2023-01-27 | 21962 | Added casting of native Airtable data types to JsonSchema types |
| 1.0.2 | 2023-01-25 | 20934 | Added OAuth2.0 authentication support |
| 1.0.1 | 2023-01-10 | 21215 | Fix field names |
| 1.0.0 | 2022-12-22 | 20846 | Migrated to Metadata API for dynamic schema generation |
| 0.1.3 | 2022-10-26 | 18491 | Improve schema discovery logic |
| 0.1.2 | 2022-04-30 | 12500 | Improve input configuration copy |
| 0.1.1 | 2021-12-06 | 8425 | Update title, description fields in spec |